Complete Step-by-Step Guide to Keep Your Bitcoins Safe
People who store their cryptocurrency on the virtual accounts, crypto exchanges or used electronic crypto wallets are now losing their money. Unfortunately, it happens all the time.
Some recent examples are the security breach at Cryptopia exchange, fund losses at QuadrigaCX and Binance, a heavy information leak from Coinmama, and breach in of one of the largest electronic crypto wallets—MyEtherWallet.
As you may guess, the scale of those financial crimes is horrifying.
“Major Bitcoin thefts began back in 2011 when 650,000 BTC were stolen from MT Gox exchange. Crimes continue to this day. One-billion-worth amount of cryptocurrency was stolen in 2018 from stock exchanges. As of the first 5 months of 2019, cryptocurrency thefts had already exceeded the amount of $1.2 billion. At the same time, net statistics show the majority of Bitcoin owners keep them on stock exchange accounts. A sharp rise in Bitcoin price will happen when its holders realize that physical Bitcoin is when private keys are kept not in online wallets or exchanges, but in their own hands.”
It goes without saying that many companies care about their reputation and try to protect their users from such issues. Rapidly growing, the market offers new solutions; but we still see lots of newbies fall into the same trap having no idea how to keep their money safe.
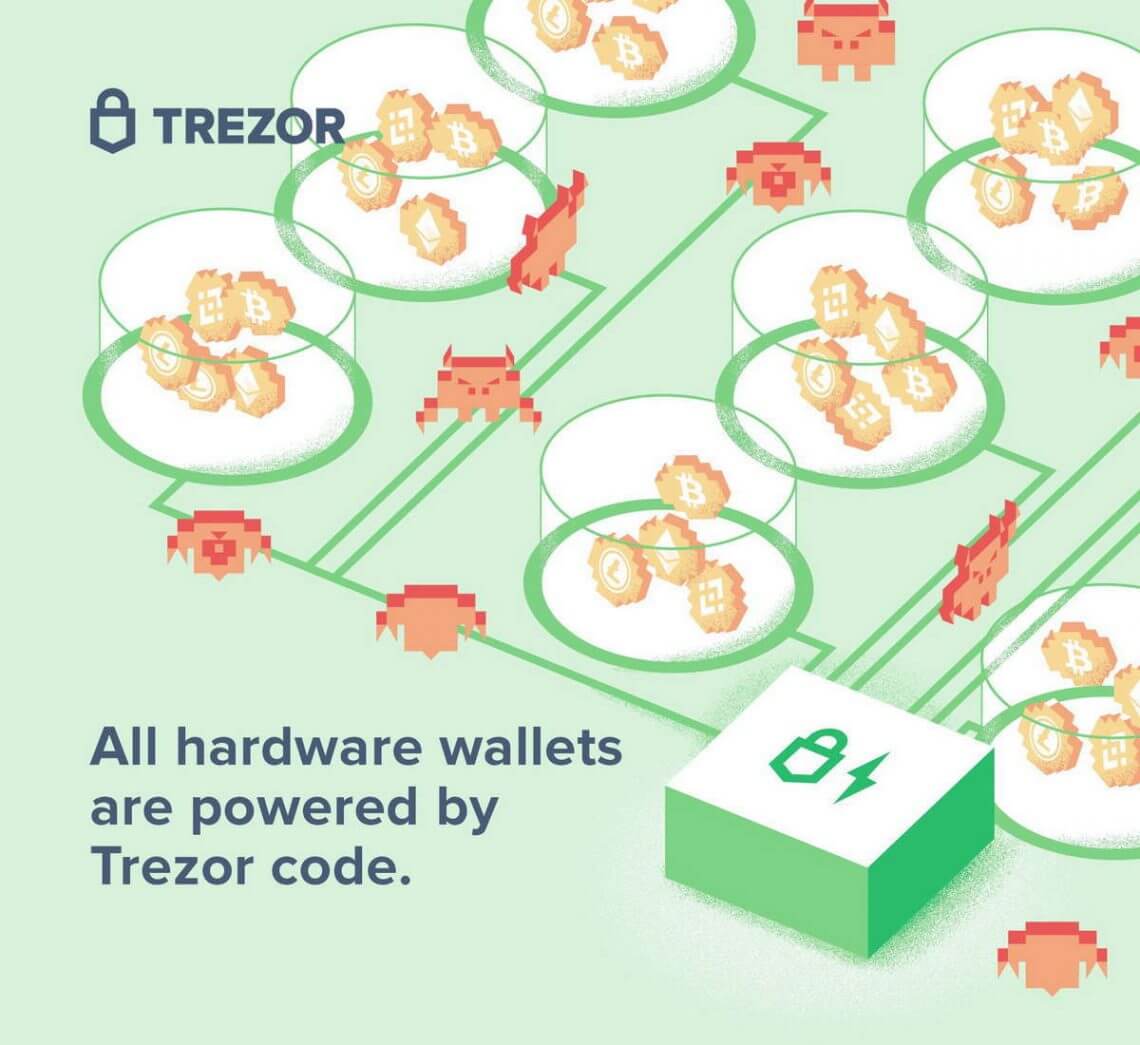
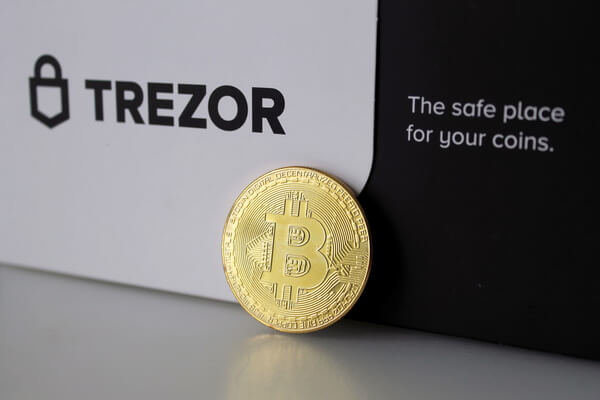
We conducted a detailed study on how you can safely store your Bitcoins, other crypto coins and digital assets. To this end, we explain why Trezor is the most convenient and reliable hardware crypto wallet in the world.
This guide details all the basic and most important functions that you can perform with Trezor, from setting to sending and receiving coins.
Table Of Contents
- TREZOR Wallet Model T Review
- Setup & Installation
- What is included in the Trezor Model T
- Installation (Trezor Bridge)
- Not Recognized in Bootloader Mode
- Installing USB Drivers for Windows
- New Wallet (Recovery seeds Backup)
- Contacts: Follow to Trezor team
- Trezor Connection & Capabilities
- Accepting & Sending Payments
- Erasing All Data (Wipe device)
- Recovering (Recover wallet)
- Updating Trezor Firmware
- Custom Bitcoin Link Handling
- Bonus
- Conclusion
- FAQ
Trezor Wallet Model T Review
Trezor Hardware Wallet Model T
GO to the official TREZOR shop >>>
Trezor was developed and released in 2014 by Czech company SatoshiLabs. In fact, Trezor is the history-first hardware wallet.
The main idea of the creators was to isolate private keys from the external environment to prevent any data leakage. And they succeeded. Throughout the company’s history, they have not recorded any single case of missing cryptocurrency!
Trezor successfully provides unsurpassed security to hundreds of thousands of crypto-enthusiasts across over 150 countries around the globe. Any user can rest assured their coins are fully protected both from physical and virtual theft.

“Our aim is to understand & deliver secure and easy-to-use solutions to real problems”
SatoshiLabs
Trezor Security
Trezor is completely safe even if you use it on the computer infected with malware. SatoshiLabs cannot track your actions or transactions as it does not have a serial number of every device.
Now let’s see what protection levels Trezor employs to ensure superior security.
Recovery Seed
For the purposes of backup, Trezor uses 12 words (Model T) or 24 words (Model One) which are called recovery seeds. This is how any user can always recover their device. We will describe this process in detail below.
Passphrase
In the personal account, a user can create wallets encrypted with a special password. This option is recommended for experienced users only.
With the help of Passphrase, you get additional reliable protection which has a triple safety effect:
- If your Trezor was stolen and its chip examined under a microscope in the hope of getting the recovery seeds, your money will still remain safe.
- If your recovery seeds were stolen, no one can recover your wallet without Passphrase.
- You can create several so-called “bait wallets” with low balance on one Trezor device. This will give you a huge advantage: an attacker will only get your bait wallet with a small number of coins instead of usurping access to your money. Therefore, never keep your Passphrase together with recovery seeds.
Phishing
Trezor is completely isolated from external threats and can work offline.
- Be careful! Never send or enter your recovery seed in the direct sequence even for Trezor technical support.
- Always carefully read URLs you visit. Attackers can use lookalike domains to steal your data.
- To avoid mistakes and misprints, add Trezor official website to your browser bookmarks (Press “Ctrl + D” for Windows or “Command + D” for Mac).
- Always install official software updates as they are released.
- Before following any link on social media or email, hover your mouse to view the URL, then enter the URL by yourself in the address bar of your browser.
- Always pay attention to shortened links, especially in social media.
- Be careful! Always conduct your own research before entrusting your confidential information to a third-party service.
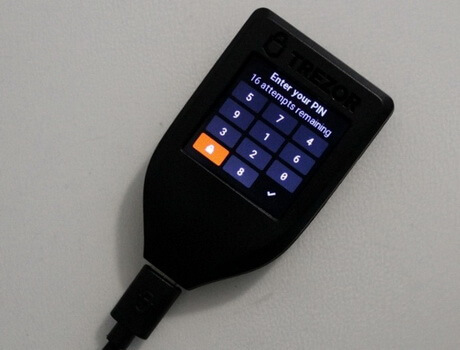
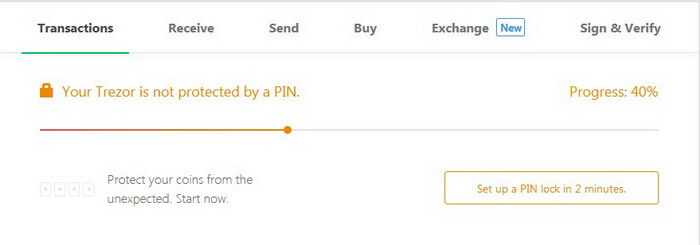
PIN code
The Trezor hardware wallet is securely protected by a PIN code (personal identification number) which can contain up to 9 digits. This powerful tool can protect your wallet from unauthorized access.
For extra security, the device automatically erases all the data after 15 incorrect PINs. Each time an incorrect PIN code is entered, the waiting time between attempts gets twice as long. For example, on the 15th attempt, the waiting time will be more than 9 hours.
Memorize your PIN or keep it in a safe place. Never store a PIN on your computer, smartphone, or anywhere else on the Internet. The same applies for recovery seeds.
If the PIN code has been lost, you can always recover it using seeds.
Do not use a simple or predictable PIN, e.g. your date of birth, 12345, 7777, etc. Use as many digits as possible.
Every time a user enters a PIN, numbers are randomly arranged.
You can also Disable PIN. However, we heavily recommend not to do this.
Malicious Firmware
Official Trezor firmware is signed by the master key SatoshiLabs. In case of installing an unofficial firmware, the memory of your device will be automatically cleared (all information will be deleted) and Trezor will be showing a warning every time it starts.
Fake Device
The Trezor device is ultrasonically welded so it cannot be opened intact.
Ultrasonic Welding
- The horn applies pressure to the plastic materials.
- The horn vibrates vertically at 20,000 to 40,000 times per second.
- Vibrations create frictional heat that makes materials melt and flow together.

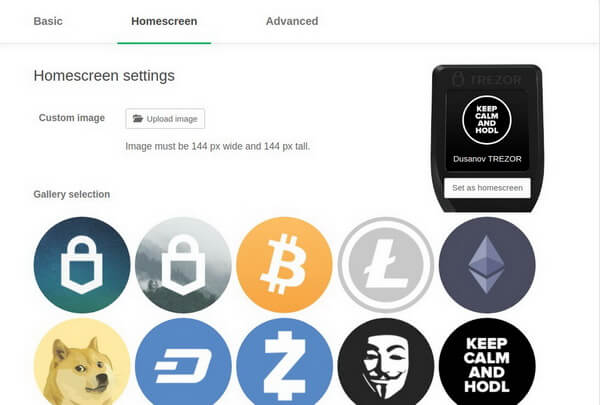
Home Screen Settings
You can sign the back of the hardware wallet with a non-erasable marker or a pen and personalize the Trezor’s main Screen by uploading your own image. As a result, you will never confuse your device with someone else’s.
Computer Theft
It is impossible to access Trezor without the hardware wallet itself. You can always use your Trezor on any device.
Hacking SatoshiLabs Servers
SatoshiLabs assures its users that security is the company’s major concern and hacking is a highly unlikely scenario. Moreover, any user can run their local copy of Trezor wallet on their computer and be completely independent of the connection to the SatoshiLabs servers. All they need is to install updates regularly.
If SatoshiLabs Shuts Down
Although this is strongly outside the company’s plans, Trezor is fully compatible with other cryptocurrency wallet standards: BIP32 (hierarchical deterministic wallets), BIP39 (mnemonic code for generating deterministic keys), and BIP44 (hierarchy with several accounts for deterministic wallets).
Developers from around the world will be able to support Trezor and add new features as the device code is publicly available. In the most extreme cases (not recommended by SatoshiLabs), it is possible to recover your funds on another wallet with the help of your recovery seeds.
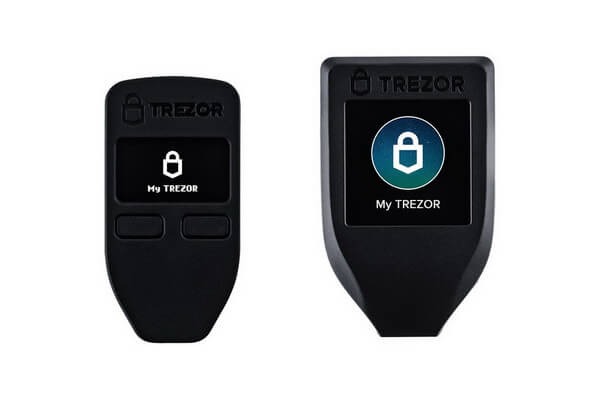
TREZOR One VS TREZOR T
to the TREZOR shop >>>
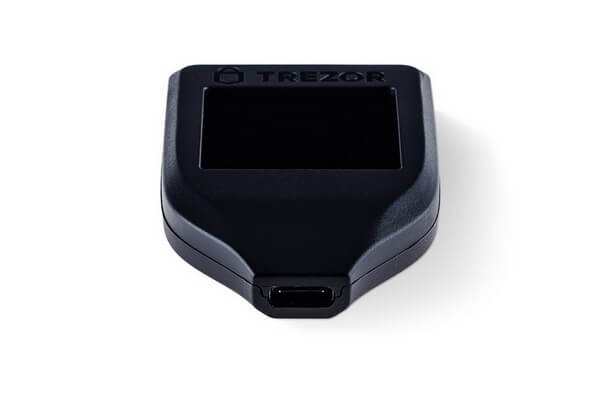
Unlike the previous model—TREZOR One that had physical buttons—TREZOR T comes with a touch screen and supports more coins.
All operations (transaction confirmation, PIN, recovery seeds, etc.) are made on the LCD display. USB connection is activated after authentication.
Trezor Model T supports microSD cards. Further, this interface will be used for everyday tasks. For example, you can sign files or save tags on an SD card instead of uploading their encrypted versions to Dropbox. The card will not store your personal data or any private keys.
The hardware wallet employs cutting-edge open-source firmware TREZOR Core which allows you to significantly simplify future updates and adding new features.
Learn more about the code on GitHub: https://github.com/trezor/trezor-core
Trezor vs Ledger
Lots of articles tell how to choose a wallet for keeping your crypto safe. So far, there are 2 main and popular rivals in the market: Trezor and Ledger.
Below we will only give three widely-known facts about Ledger hardware wallet:
1) Ledger uses JavaScript
“Ledger wallets generate the recipient address using JavaScript code running on the host machine. To this end, malware can simply replace the recipient address-generating code with its own address: this way, all future deposits will be sent to the attacker.”
Trezor uses the 2FA: you have to confirm every action with your wallet by yourself.
2) Ledger saw a case of cryptocurrency loss. A customer using a Ledger hardware wallet lost $74,000 (1,600 XMR).
Source: https://www.reddit.com/r/Monero/comments/ax0pqt/alert_stop_using_ledger_with_014_client/
In the entire Trezor history starting in 2014, there has not been a single case of loss of cryptocurrency from the wallet.
3) Ledger has Twittered about a new vulnerability
The attackers faked the screen of their wallet and asked to enter the recovery seed. The users again lost their money.
WARNING: we’ve detected a malware that locally replaces the Ledger Live desktop application by a malicious one. Users of infected computers are asked to enter their 24-word recovery phrase after a fake update. Please refer to our security best practices https://t.co/MlAUlgoqj9 pic.twitter.com/Qzr3o4xaOq
— Ledger (@Ledger) April 25, 2019
Unlike Ledger, you can connect your Trezor hardware wallet to any infected computer or smartphone and use it freely. Trezor keeps your private key inside your device and does not put it in open access.
We hope Ledger will soon fix the existing weak spots of their security.
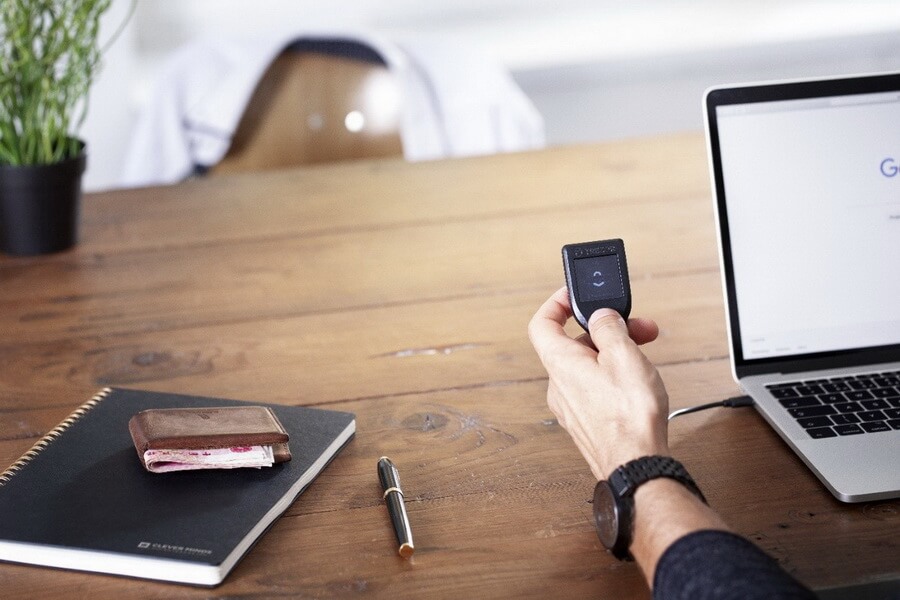
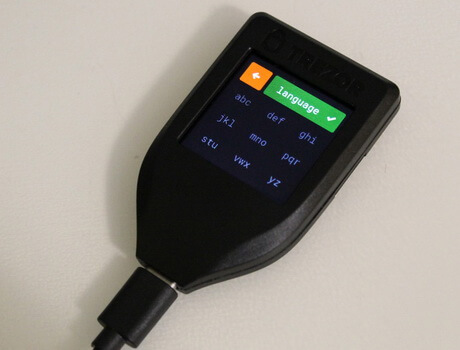
Trezor Model T: Setup and Installation
Now, let’s take a closer look at the entire installation process of Trezor Model T. This is the most up-to-date model with the intuitive UI and enhanced level of security which has been tested by first-class specialists. The hardware wallet has a touch screen, faster processor, and expanded coin support.
The device is very light and resistant to X-ray, so you can easily carry it on the plane.
Absolutely any user—an expert or not—can easily figure out how to set up Trezor. You no longer have to wonder how to keep your Bitcoins and other digital assets safe. Your keys always stay within the device as it is completely isolated.
Once you receive your parcel, the first thing you need to pay attention to is packaging.
Carefully inspect the condition of the envelope and package cellophane.
The security hologram with which the USB port is sealed must be intact (it is very difficult to remove it without leaving a trace). Otherwise, if your hardware wallet was opened by someone, immediately contact Trezor technical support and they will send you a new one.
That’s why it is strongly recommended to order Trezor directly from the manufacturer

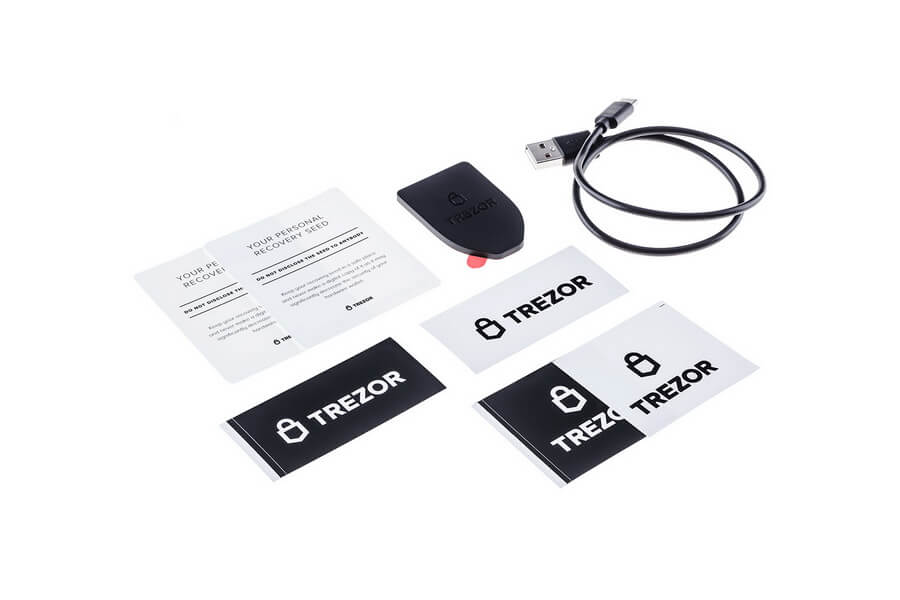
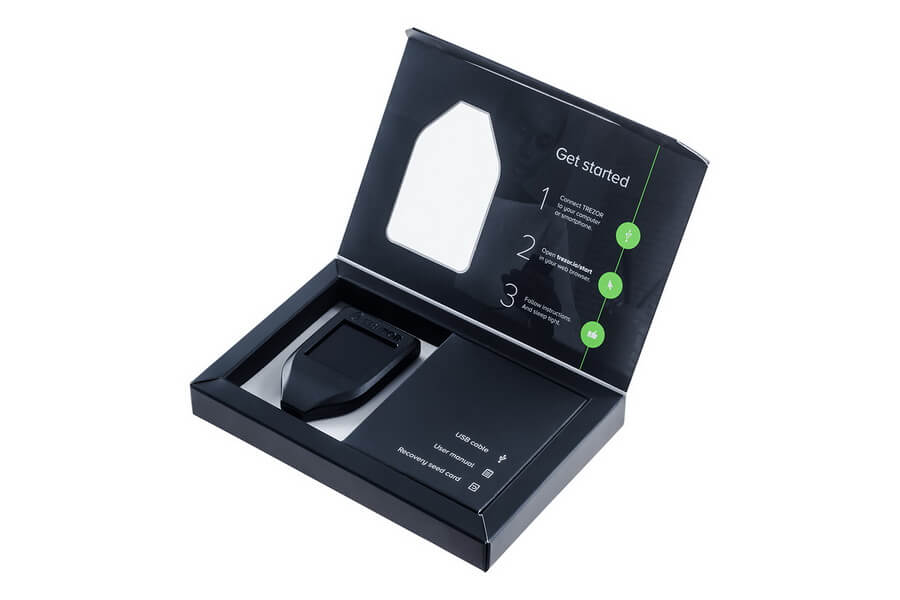
What is included in the Trezor Model T
- Trezor Model T hardware wallet
- Magnetic dock that you can attach to any convenient place where your device will be harder to find (e.g. on the lid top in a desk drawer).
- USB-C cable. Works all the time. No matter the side.
- 2 booklets to record recovery seeds
- Trezor Stickers
- User guide
- Box
Dimensions & Weight
Dimensions: 64 mm x 39 mm x 10 mm (2.52 in x 1.54 in x 0.39 in) / Weight: 22 g (0.77 oz)
Operating Temperature
-20°C to +60°C (-4°F — +140°F)
Connectivity
USB-C connector for connecting to the computer or mobile phone.
CPU
168-MHz embedded ARM processor (Cortex-M4) running a custom developed system, the Trezor Core.
Screen
Bright color LCD: 240×240 pixels.
Safety & Certifications
Trezor is CE and RoHS certified: it complies with all quality, reliability, and environmental standards. It’s fine to take your Trezor with you to an airplane. Like all modern electronics, the X-Rays won’t hurt it.
Trezor Installation
It’s just about a few short steps to install your Trezor. During working on this article, we conducted several large-scale tests and described the entire installation process and the problems that Windows OS users may encounter in as much detail as possible.
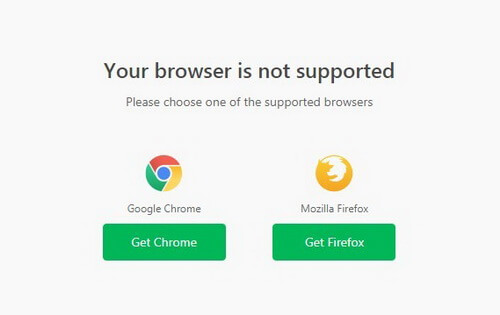
By the way, Trezor does not support all browsers. For example, Opera is not compatible with it yet.
In our article, we use Google Chrome and the Windows 7 operating system.
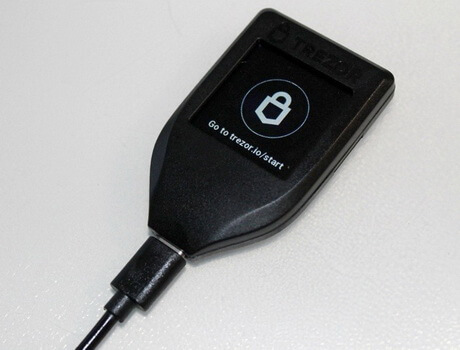
We connect the hardware wallet to a computer or smartphone.
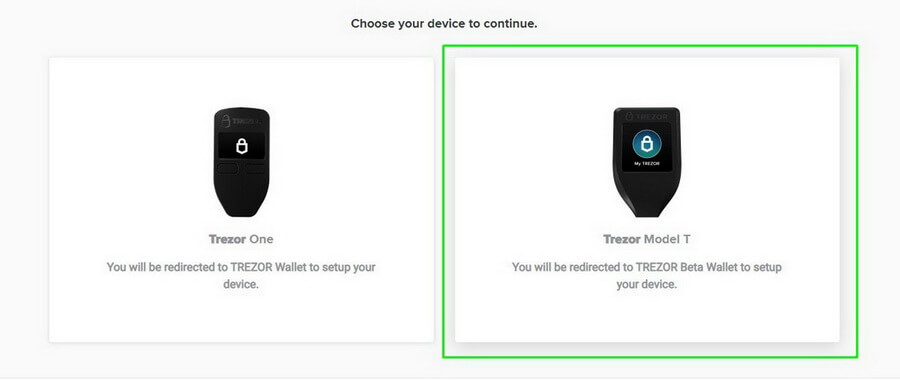
Trezor greets: “Welcome! Go to trezor.io/start”.
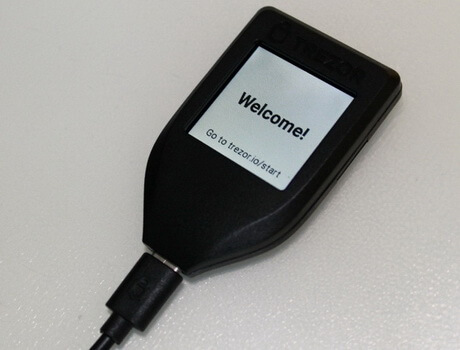
Follow this link in your browser and select Trezor Model T.
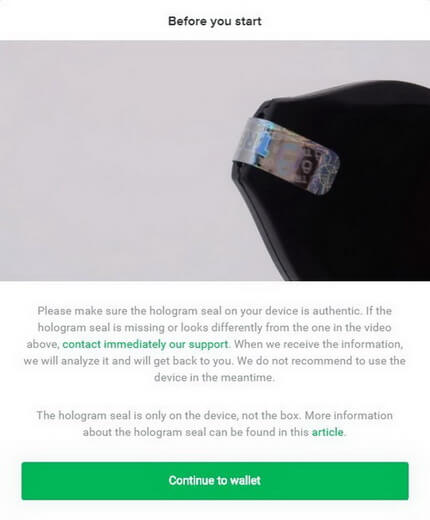
Then it warns that the hologram seal needs to be authentic and intact. If you have any doubts, and your hologram is different from the one shown in the video, please contact Trezor technical support and do not connect your device to the computer.
Next, you need to install Trezor Bridge. It is an application that runs in the background on your computer and provides connection between Trezor and your browser.
Note. If you are using Firefox, restart the browser after the first installation of Trezor Bridge.
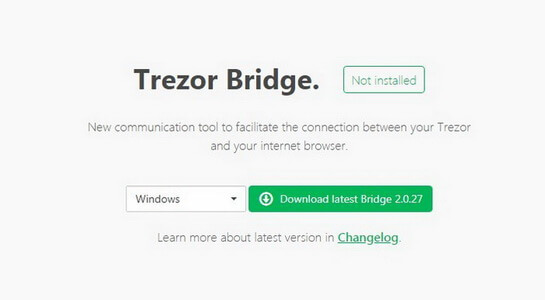
Choose your version of operating system and click Download.

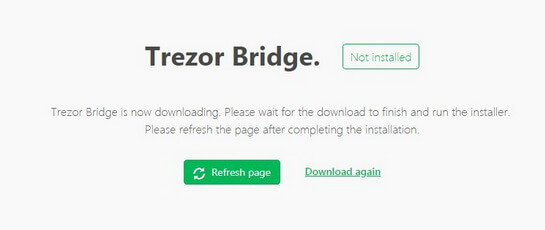
Installation for Mac OS passed entirely without incident but Windows faced some difficulties. Below is the explanation of a case.
After Trezor Bridge application is downloaded to your computer, install it and reload the page to get to your personal account.
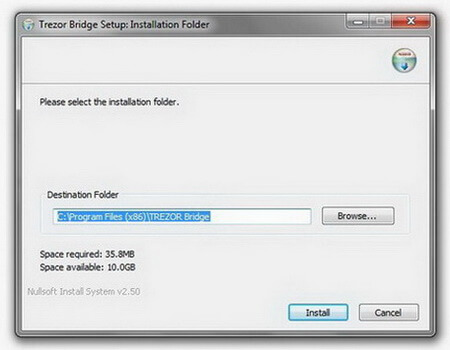
Follow the installation steps: select a destination folder and click Install.
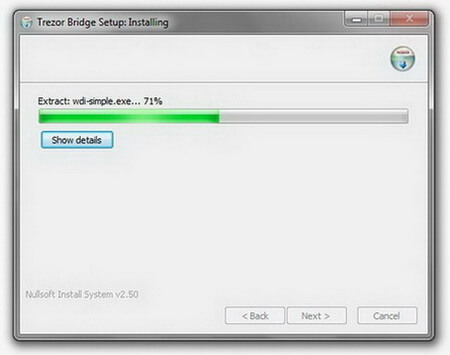
The application will install quite fast.
The program will ask you to disconnect your Trezor to complete the installation.
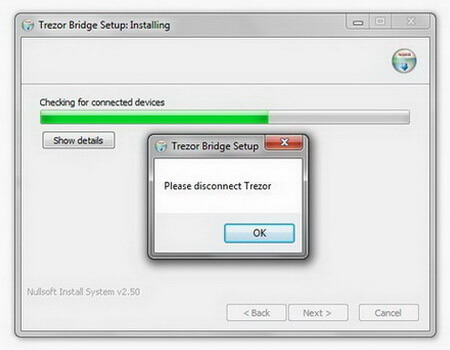
Click OK and Next.
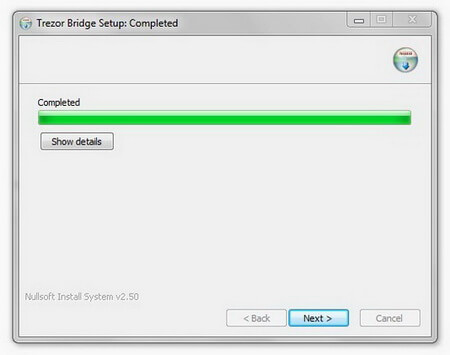
Flag Start Trezor Bridge and click Close.
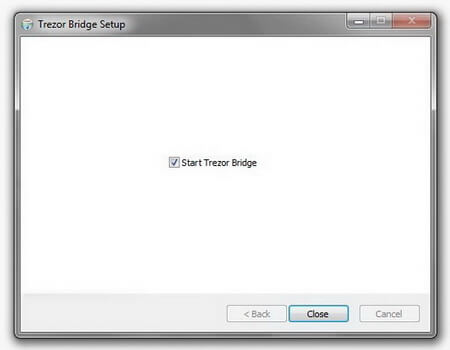
The program is now installed on your computer. Now connect the Trezor and refresh the browser page.
Trezor Wallet Not Recognized in Bootloader Mode: “Connect your Trezor to continue”
What if nothing happens and your hardware wallet fails to connect after installing Trezor Bridge?
We used Windows 7 (similar problems may also occur with Windows 8 and Windows 10).
The fact is that the operating system from Microsoft cannot recognize the new device that is connected to your computer. This cause for this is the USB driver.
You can read more about solutions for the problem on Trezor official website (works for versions 8 and 10):
https://wiki.trezor.io/Device_not_recognized_in_bootloader_mode
In our case we chose to replace the driver:
To do this, go to the site recommended by SatoshiLabs.
Installing USB Drivers for Windows
Go to Zadig.
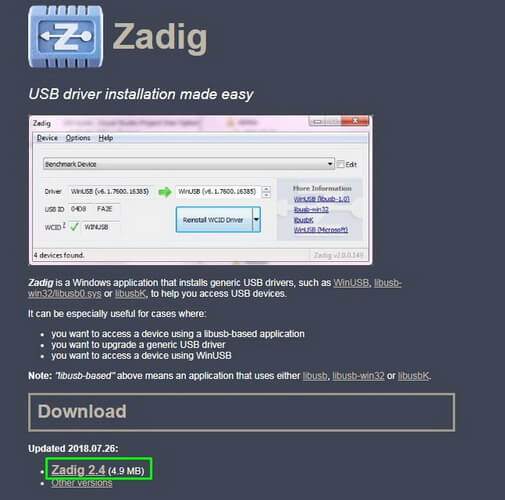
Download the program to replace your USB driver and launch it.
You need to choose something like “Unknown Device # 1” and select the driver “libusb-win32”.
(If something goes wrong, write us in comments and we will try to help you sort out the problem. During installation, we tried several variants of different drivers. Some of them could start but after a few minutes the operating system could not recognize the new Trezor device).
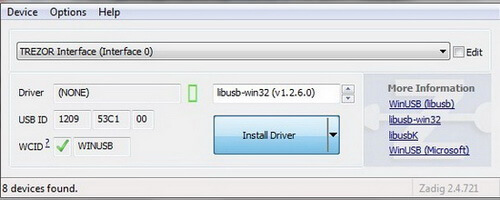
After your USB driver has identified a new device, you will see the following message:
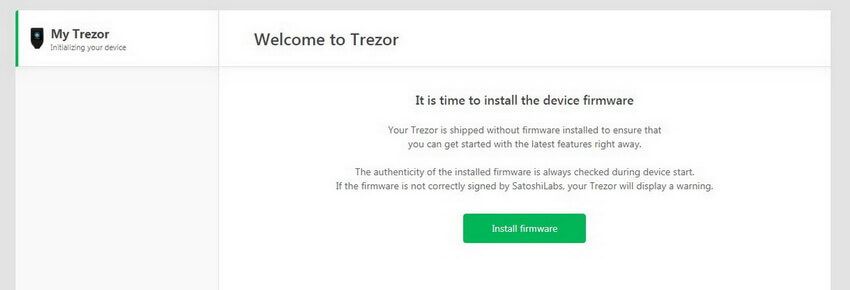
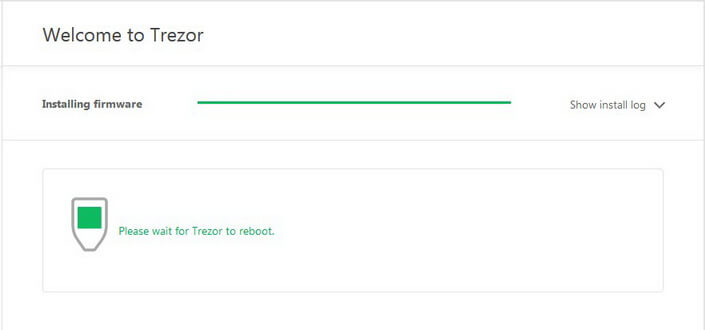
Congratulations! Now you need to install the firmware on the hardware wallet itself.
Initially, the device has no preinstalled program: this makes its security even better (in Trezor One the firmware was already installed by default).
Click Install firmware.
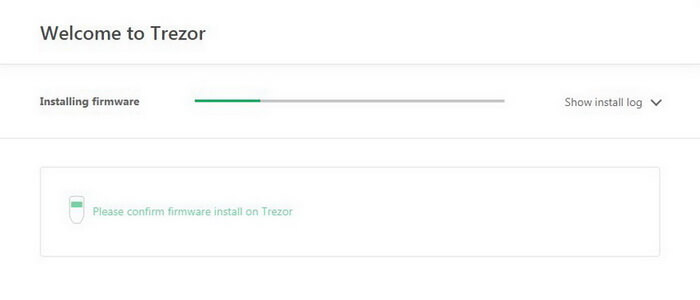
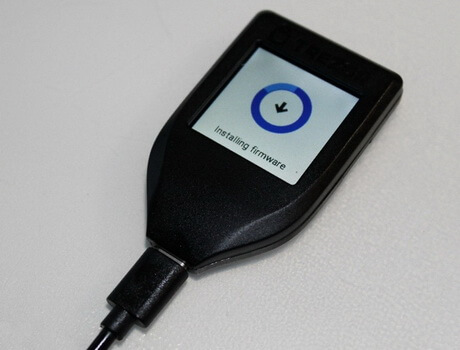
During the installation you can view all the log files in your browser and observe the process on Trezor screen:
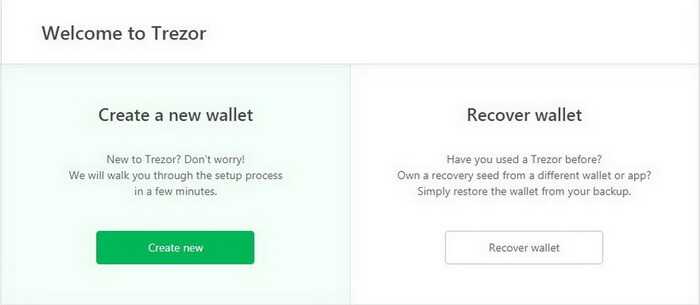
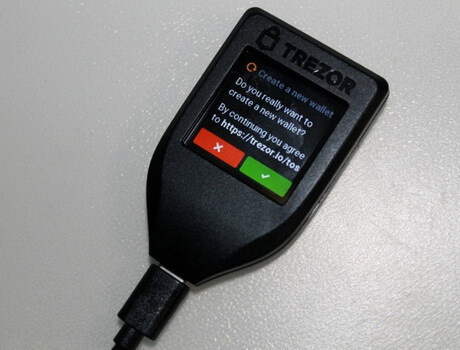
Next, you have to choose Create a new wallet or Recover wallet.
Installing New Trezor Wallet Model T
Confirm Do you really want to create a new wallet? on the device screen.
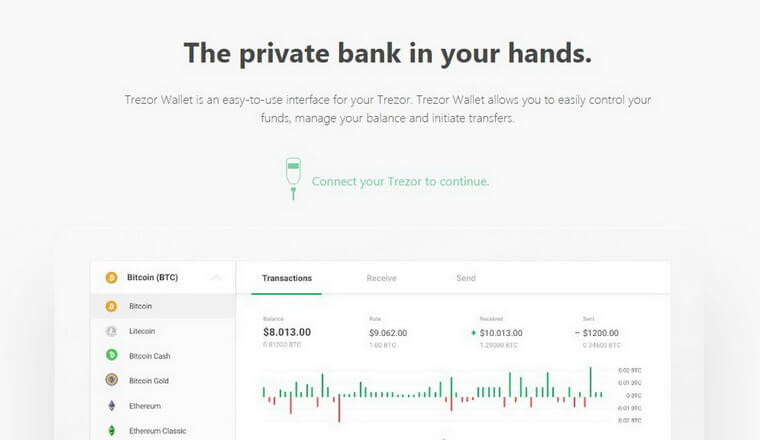
Your browser will open your personal account.
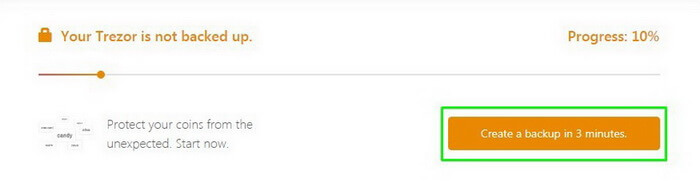
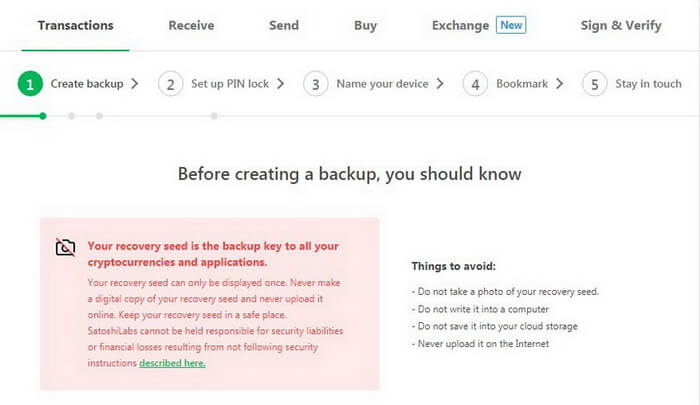
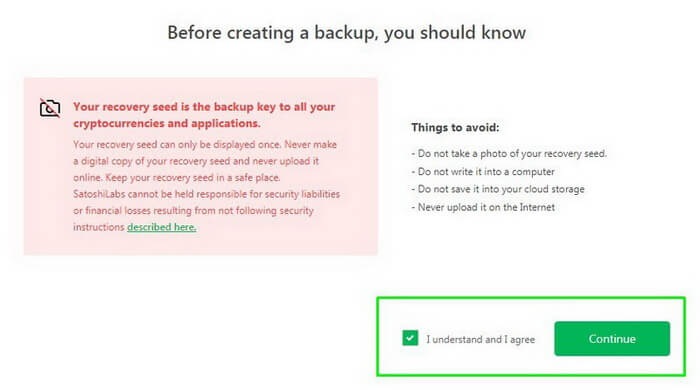
Now you have to backup.
Be sure to save your recovery seeds in a secure place so you could recover all your data and save your money in case of breakdown or losing device/password/PIN.
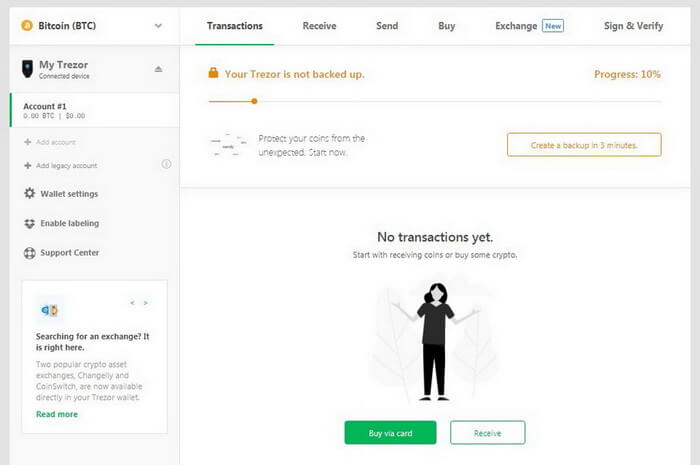
Click Create a backup in 3 minutes.
Very important:
- Do not take a photo of your recovery seed, nor print it.
- Do not keep it on a computer.
- Do not save it to your cloud storage.
- Never upload it to the Internet.
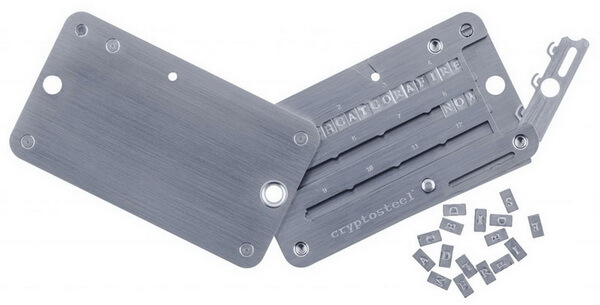
- You can write down your recovery seeds on special sheets of paper were supplied with your device and hide them in a safe place.
One of the most reliable ways to save the seeds is Cryptosteel that cannot burn in a fire and can withstand any cataclysm. Cryptosteel technology combines the age-old idea of engraving with a DIY assembly and materials that are stainless, rust-free, acid-resistant, and fireproof up to 1200°C/2100°F.
This is a physical backup tool for your data.
Cryptosteel is fully stainless steel-made and resistant to corrosion and shock.
Don’t panic if someone suddenly finds your Cryptosteel. You can only add 4 letters from each phrase in each free cell: the rest will be only kept in your memory.
If everything is clear, confirm and click Continue.
Do not disconnect your device during the backup.

Confirm the action on Trezor screen.

After confirmation, the recovery seeds will appear on your device screen.
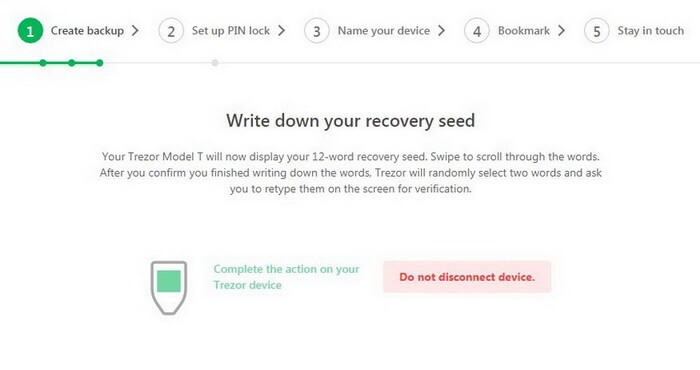
Carefully write down all the phrases on a sheet of paper and/or add them to your Cryptosteel.
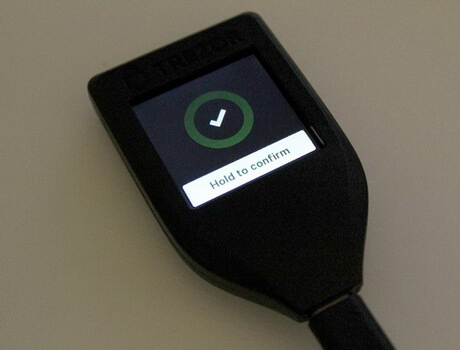
After you finish, confirm the action on the screen of your hardware wallet: click and hold Hold to Confirm.
Trezor will ask you to enter 2 any phrases in random order to check and confirm the correctness of your actions.
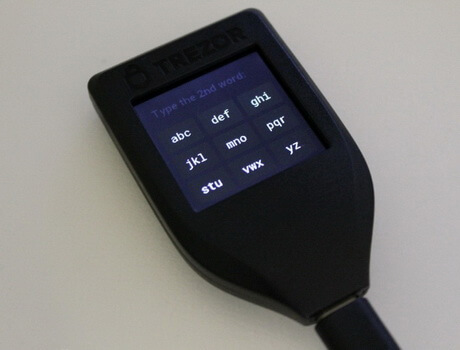
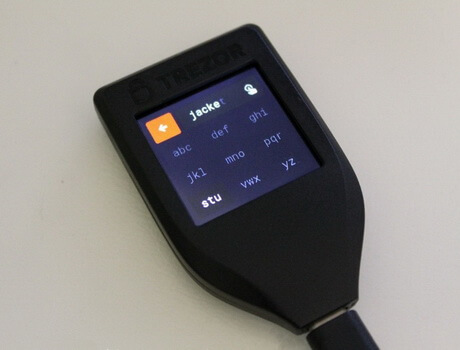
The main principle here is the same as that in an obsolete old push-button telephone and a T9 keyboard (enter the word like on a T9 keyboard). You simply click on the desired cell several times until you get the desired letter.
The program will help you predict the words.
Example word on Trezor
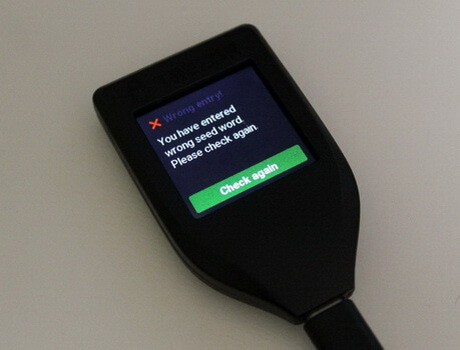
If you confirmed the wrong word, Trezor will warn you about the error and ask you to repeat the whole procedure again.
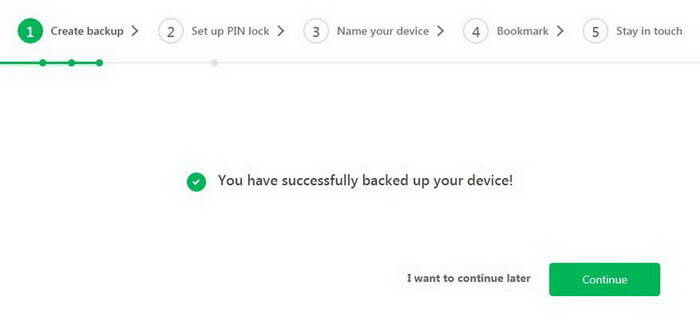
Congratulations! You have successfully completed the backup!
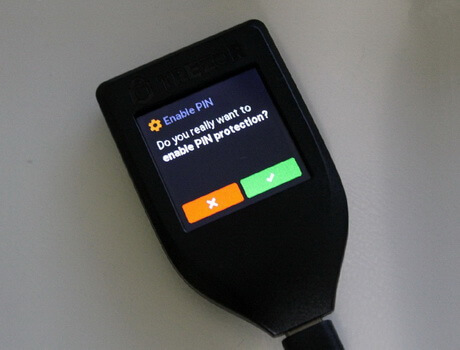
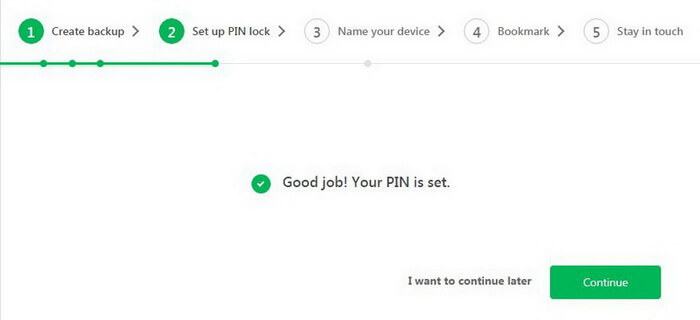
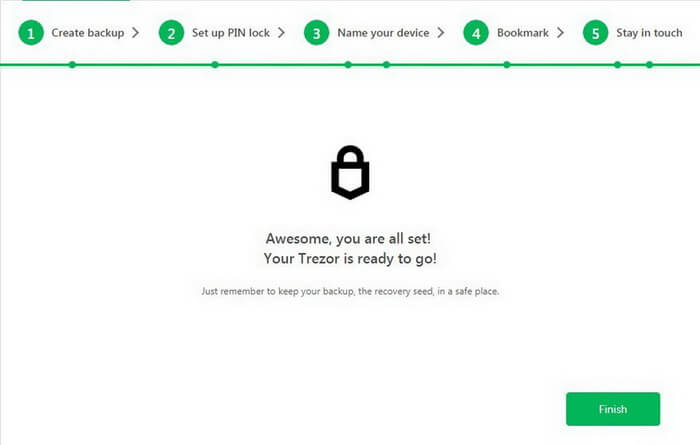
Now create and save a strong PIN.
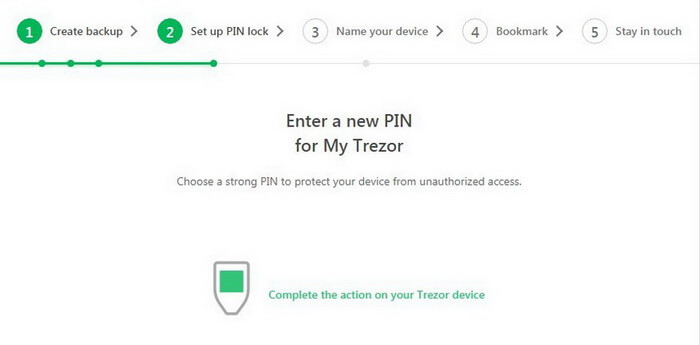
Confirm your action on the screen.
Good job!
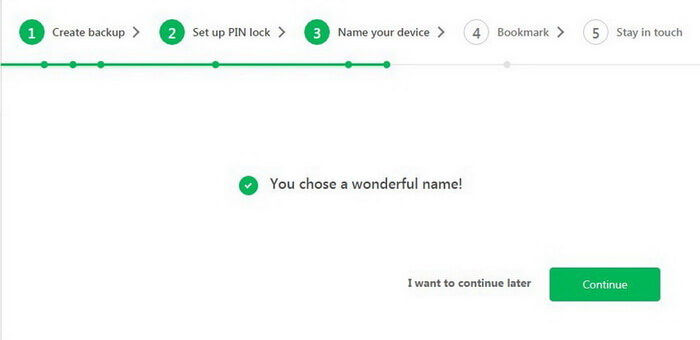
Next, the service offers you to create a username for your Trezor. It looks very cool!
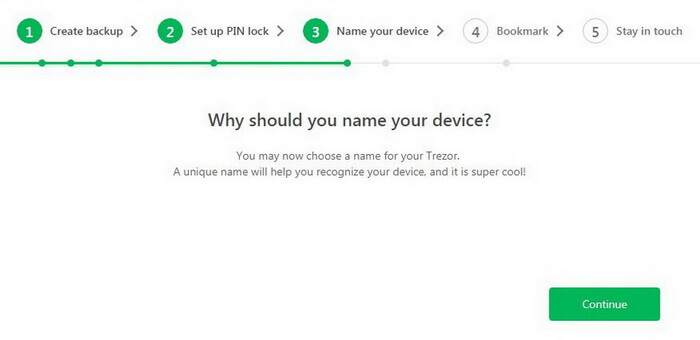
You can enter any name and change it at any time later.
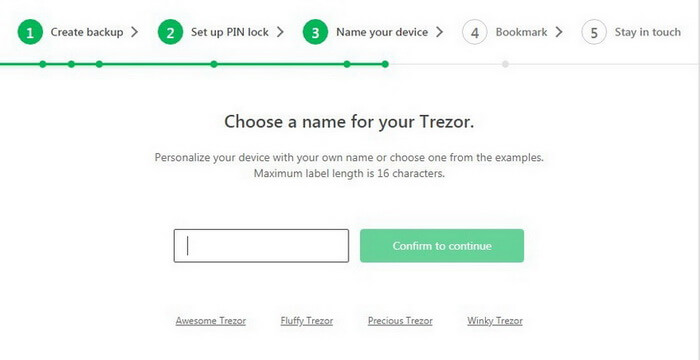
Click Continue.
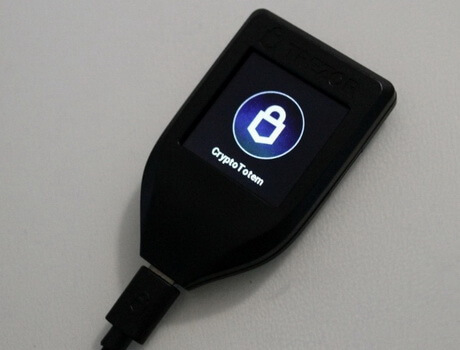
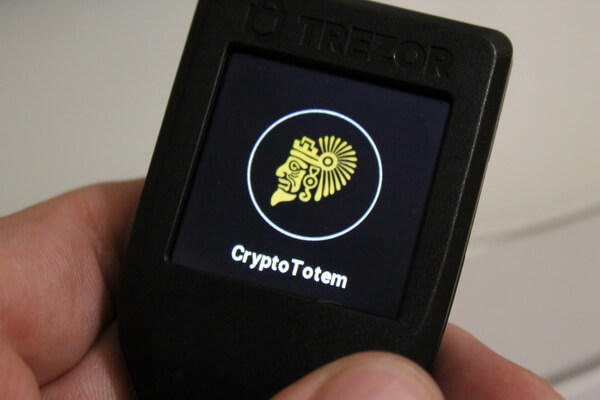
Our new CryptoTotem is ready to go.
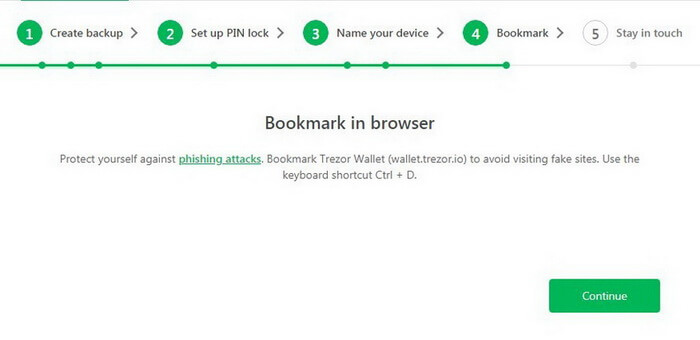
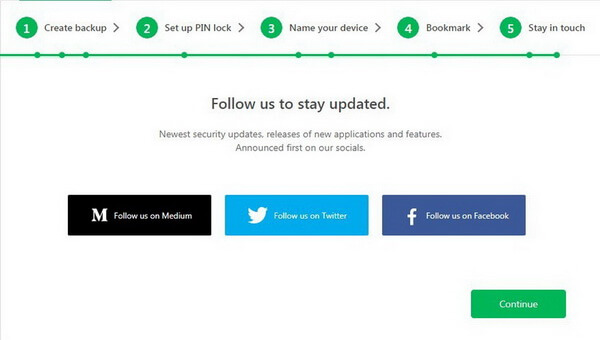
For convenience and safety, add Trezor website to your browser bookmarks (Ctrl + D for Windows or Command + D for Mac).
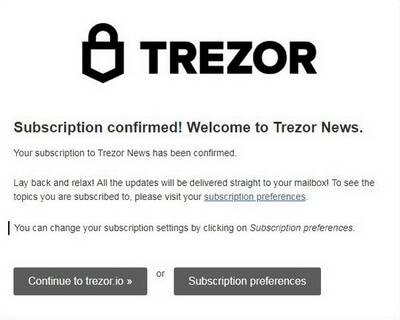
Add your email address to receive information about new updates and security tips on time.
Subscription is optional. Trezor does not create a link between your wallet and email address.
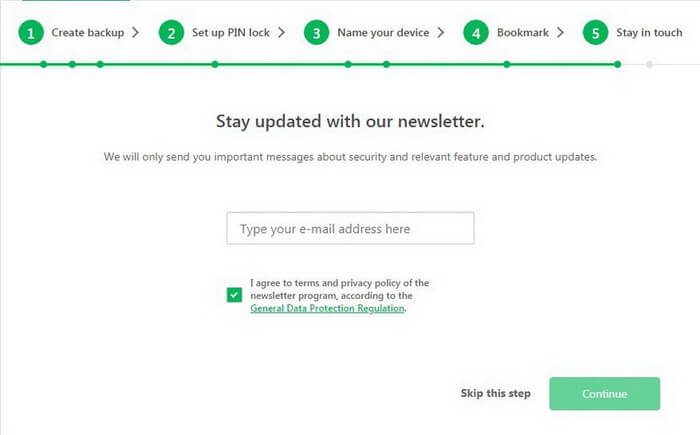
You can always unsubscribe later.
You can also follow the project news on social media:
Website: https://trezor.io/
Blog: https://blog.trezor.io/
Twitter: https://twitter.com/trezor
Facebook: https://www.facebook.com/trezor.io
Reddit: https://www.reddit.com/r/TREZOR/
GitHub: https://github.com/trezor
Follow to Trezor team
Congratulations! Now Trezor is ready to go.
Trezor Connection and Capabilities
To get started, connect your Trezor hardware wallet to your computer, laptop, or smartphone.
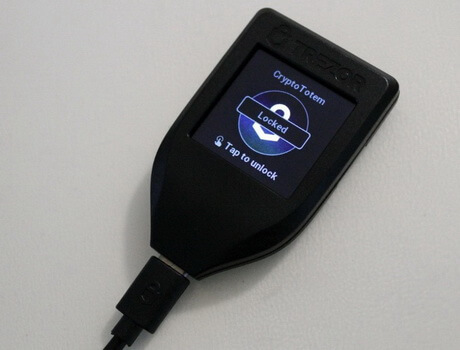
Tap the screen and enter your PIN.
Accepting and Sending Payments
For each transaction, Trezor generates new addresses.
This is how the device helps you get more anonymous and avoid being identified when you try to track your payments.
Every time you click Show full address in your account, the address is duplicated on the device screen which guarantees your safety. You can always confirm any action and be completely sure no one can change the address since the device completely prevents any viruses.
How to Receive Cryptocurrency
Select Transaction and/or click Receive.
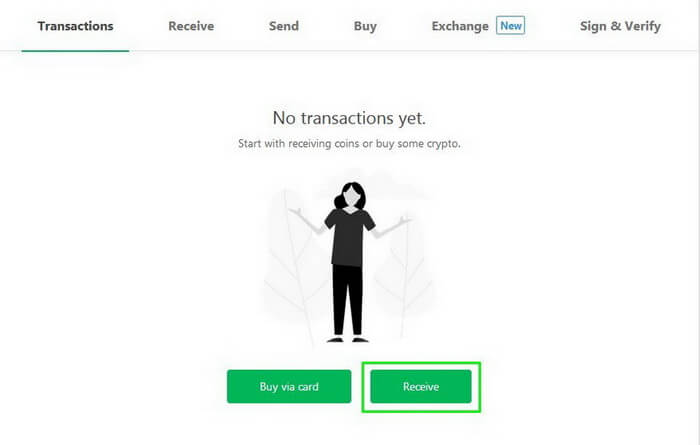
You will see that Trezor has already selected Bitcoin (BTC) wallet. It uses SegWit addresses, but it is also possible to use outdated addresses for transactions.
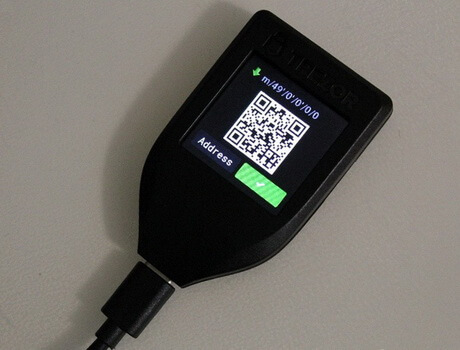
Click Show full address to see your new address for receiving Bitcoins. Carefully check if the address in the browser matches the address on your device.
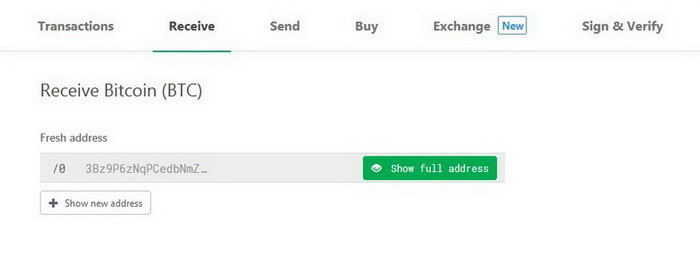
Confirm your address in Trezor hardware wallet.
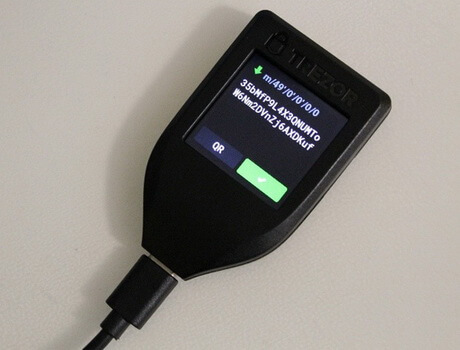
Now you can use this address to get Bitcoins with your Trezor. Moreover, you will be the only person knowing the address private code.
As an example, we will send a few coins from our Electrum wallet. We strongly recommend not to keep large amounts on online exchanges.
With Trezor you can create any number of addresses to receive funds, sign your transactions, or label each address for different operations (e.g. for business or for personal purchases).
All your addresses remain effective.
Transactions will show you all of your transactions: current account balance, incoming and outgoing transactions, coin exchange rate, and graphical analysis. All these data can be exported in CSV or PDF format.
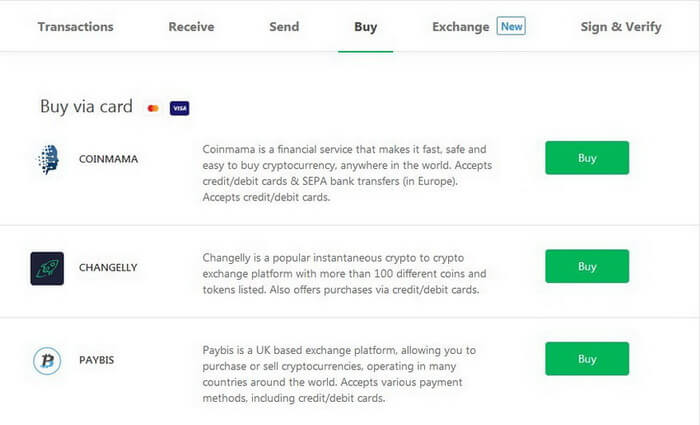
How to Buy Cryptocurrency
You can also buy Bitcoins using your VISA/MasterCard debit or credit card in services you will see in your account.
Currently, Trezor supports the following services:
- Coinmama
- Changelly
- Paybis
- Changenow
- Coinswitch
- CoinMate
- BTCDirect
- Shakepay
- Coinberry
- Bitpanda
- Simplecoin
- Coingi
- Bittr
Go to Buy and choose the handiest method.
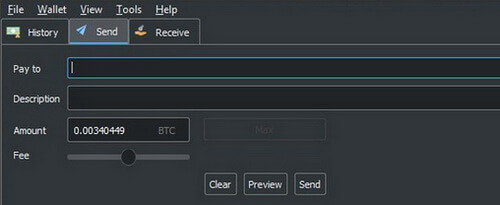
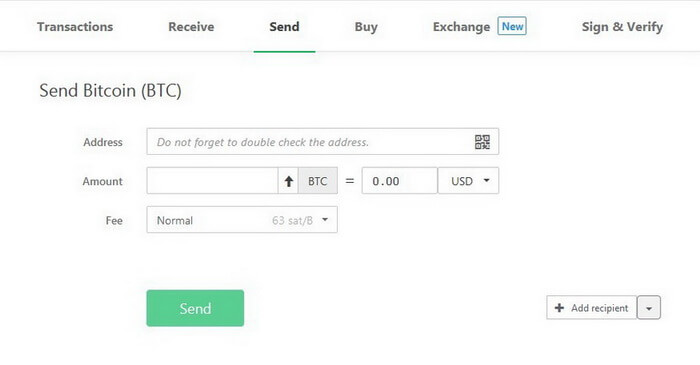
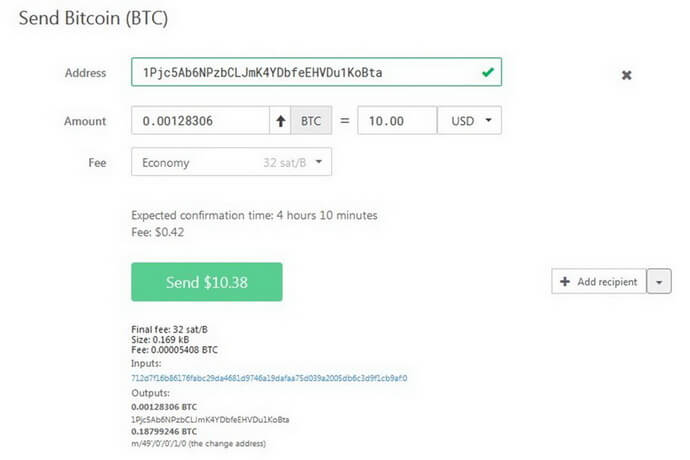
How to Send Cryptocurrency
In order to send your Bitcoins or other cryptocurrency funds, proceed to Send.
Do not forget to send and receive funds between same-currency accounts: otherwise, you can lose your money.
1. Address. Enter the destination address for your transaction (or use a QR code).

If you enter an invalid address, Trezor will warn you about this:

2. Amount. Enter the required amount (cryptocurrency rates are based on CoinMarketCap data).

Use the arrow to send all your coins at once.
You can also send cryptocurrency to several addresses. This option is very convenient and saves you money when paying for transactions.
Click Add recipient or import a CSV file containing addresses.
3. Fee. Transaction charge to be paid to miners (Trezor does not charge you any fees).
When you receive funds depends on the priority level.
Please note the recipient will see the fact of a transfer from you almost instantly. However, it takes funds some time to arrive.
Transaction priority levels:
- High
- Normal
- Economy
- Low
4. If you chose labeling, you can see the additional line, Comment.
![]()
Next, click Send and confirm this action on Trezor screen. Carefully check the amount and address of the recipient’s wallet.
If the amount of funds or the address does not match, contact Trezor support: your computer may be infected.
Trezor Exchange
After paying into your account—in our case it was Bitcoin—you can exchange coins for other cryptocurrencies.
To do this, go to Exchange and select a coin you want to exchange.
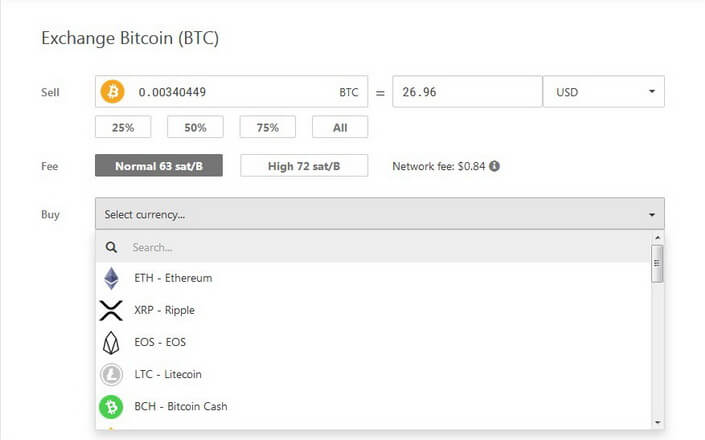
You can find the full list of all supported cryptocurrencies and altcoins on the official website: https://trezor.io/coins/
Currently, Trezor supports over 1,000 coins and tokens.
It is very convenient since you can store everything in one place.
Although built-in applications are not for all coins, Trezor easily integrates with other wallets such as MyEtherWallet and MyCrypto.
All third-party applications used for other crypto coins act as an interface, so don’t worry about private keys: they never leave the Trezor device.
Erasing All Data
If you need to remove all information from your device or reset Trezor in such a way, you can use the wiping function.
https://wiki.trezor.io/User_manual-Wiping_the_Trezor_device
To do this, click on the wallet name in your account and go to Advanced.
Next, click Wipe device.

Make sure your recovery seeds are kept in a safe place. If they aren’t, you will lose all the data forever.
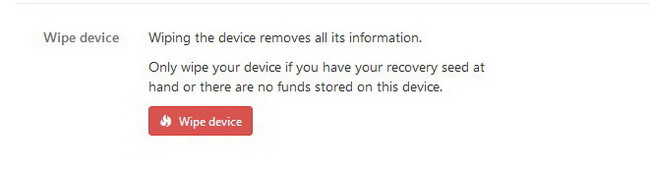
Remember: you can always use Check recovery seed to test your seeds in a dry run:
https://blog.trezor.io/test-your-seed-backup-dry-run-recovery-df9f2e9889
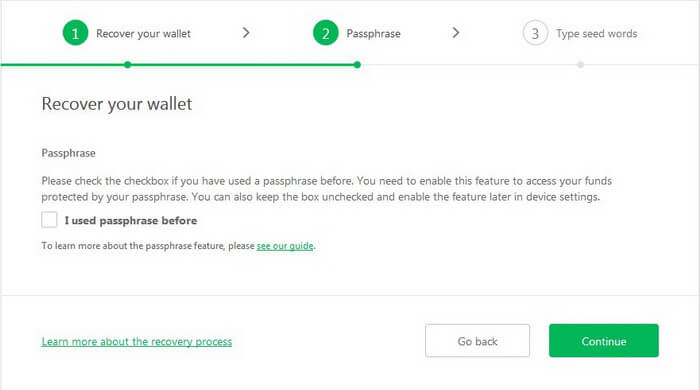
Recovering Trezor
If—for any reason—you need to restore your Trezor (e.g. you have forgotten your PIN-code), it is as easy as create a new one. To do this, you only need to know your recovery seeds saved during backup.
Connect the device into the computer, go to the website: trezor.io/start.
Then select Recover wallet.
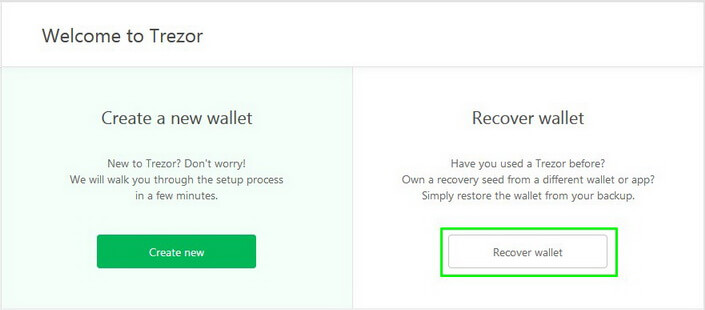
Learn more on https://wiki.trezor.io/User_manual:Recovery
To recover your wallet, you will have to enter all the recovery seeds in the same order in which you saved them.
Trezor does not transmit any data to computers or browsers so you will perform all actions directly on the hardware wallet.

If you didn’t use Passphrase, don’t flag it.
Click Continue.
Confirm your choice on the device.
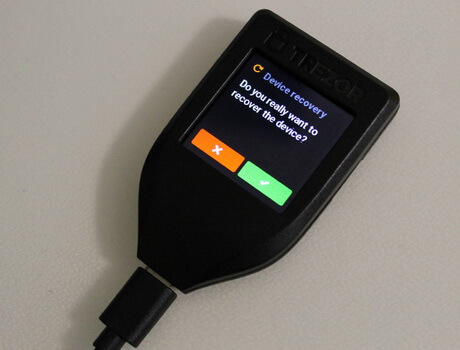
Next, you will only work on the device screen.
Choose the number of words your recovery seed had.
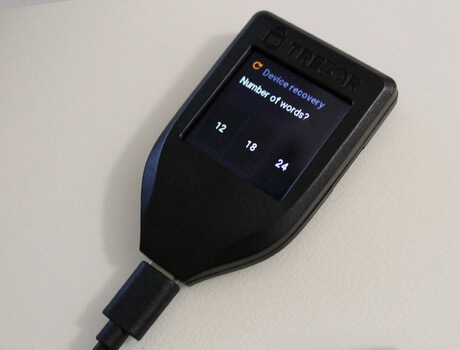
Now you need to enter all your recovery seeds in a common sequence.
Make sure you do all that in an isolated and secure place.
Once you enter all your recovery seeds in the required sequence, Trezor will offer to create a new PIN code.
Updating Trezor Firmware
Every day SatoshiLabs is working hard to improve its products. As a user, you have to update your Trezor regularly.
When a newer version is available, you will see a message in your personal account.
Click Show details.

Disconnect the device from the computer and start swiping your finger on the touch screen as illustrated. At this moment connect the Trezor without stopping your actions.
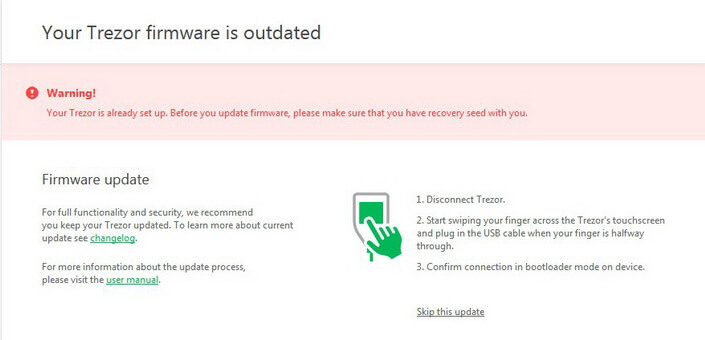
Confirm the update.
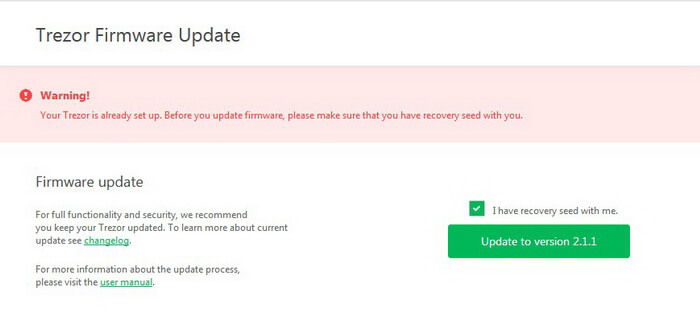
The program will be installed to your device automatically.
Getting Rid of Custom Bitcoin Link Handling in Chrome or Firefox
You can also allow Trezor to open all Bitcoin links by default. This means that having the option enabled, if you click on bitcoin links (e.g. donation addresses), your Trezor wallet will be opened.
If you are going to use your Trezor every day, this function may come in handy.
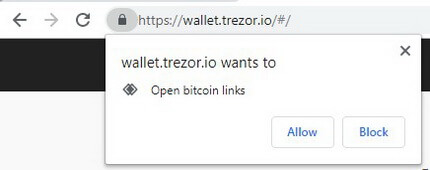
However, you can always disable this rule in your browser.
Let’s see how you can do this.
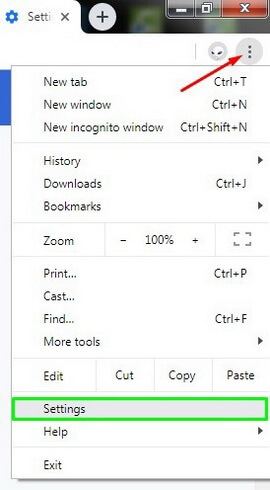
Google Chrome
1. Open Settings.
2. Click Advanced at the page bottom.
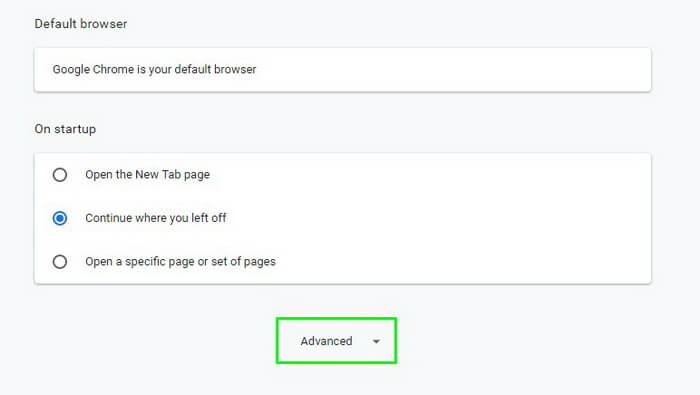
3. Go to Site Settings.

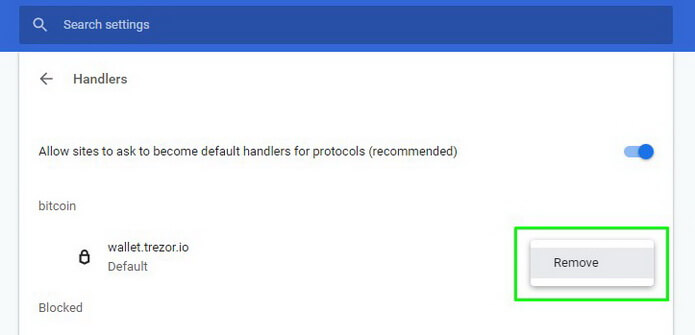
4. Select Handlers.
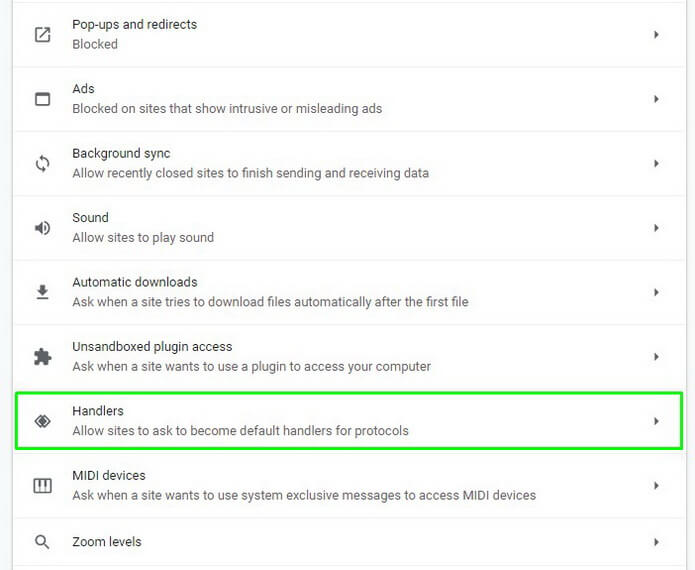
5. …and remove wallet.trezor.io out of your settings.
Alternative method: go directly to your Google Chrome address at “chrome://settings/handlers“ and disable this rule.
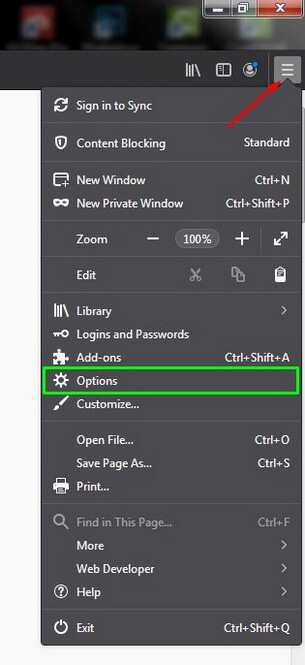
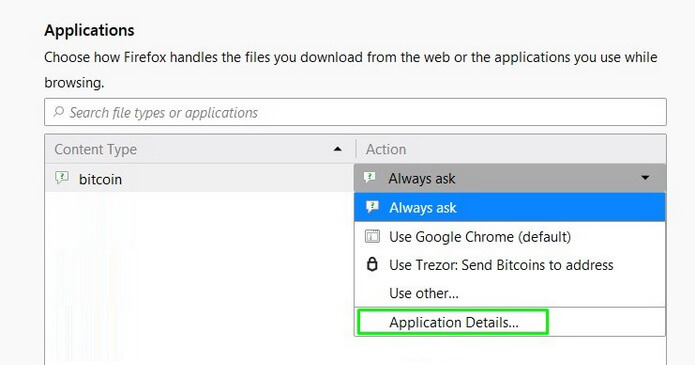
Mozilla Firefox
1. Open the browser menu and click Options.
2. In Application, enter Bitcoin or select from the list.
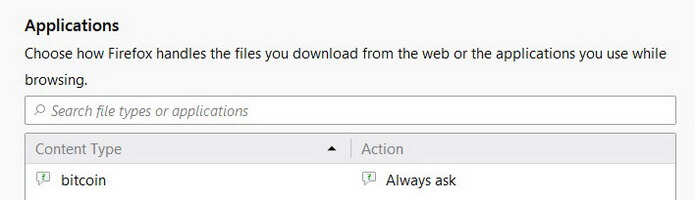
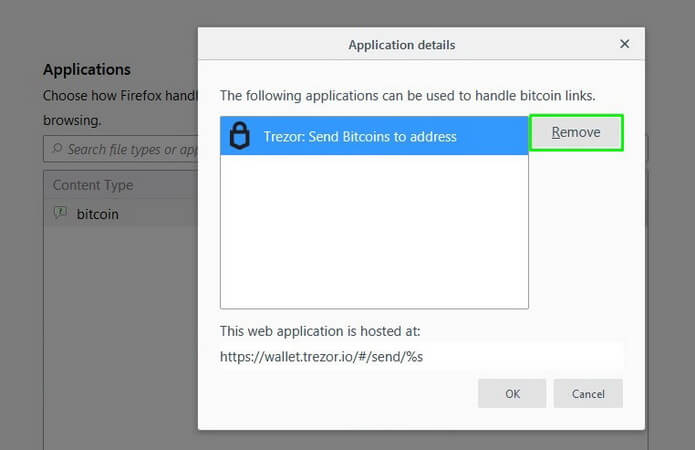
3. Click Always ask and select Application Details in the list.
4. Next, click Remove and OK to disable the option.
Additional Security to Protect your Windows PC: Disabling AutoRun
Online wallets are not reliable to store your bitcoins and other cryptocurrencies.
Your private keys are stored on a third-party server which at any time can use them or undergo a hacker attack.
Be extremely careful and keep your money in a secure place. Today this place is called Trezor.
However, additional security still never hurts—especially if you use other programs and applications.
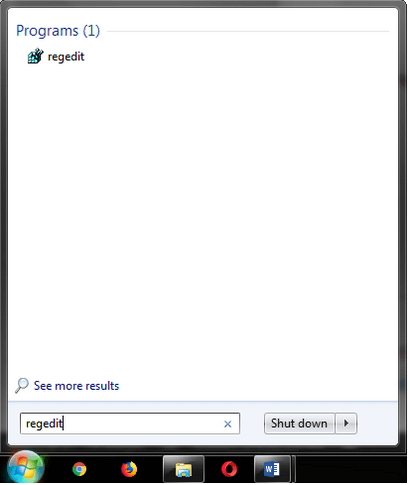
As a bonus for Windows users, we will tell you how you can significantly improve the protection of your data with the help of disabling AutoRun.
Open the Start menu and enter regedit in the search box.
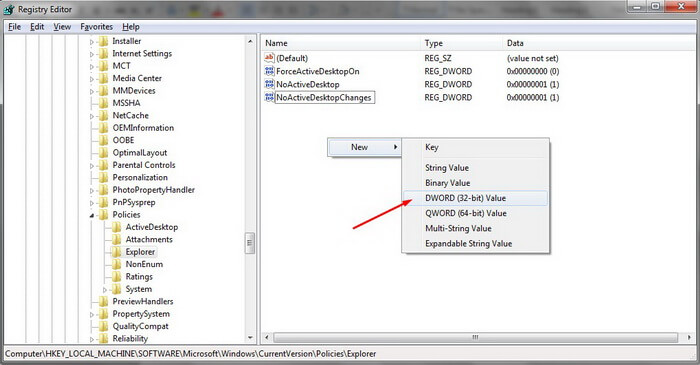
Next, follow the path: Regedit – HKEY_LOCAL_MACHINE – SOFTWARE – Microsoft – Windows – CurrentVersion – Policies – Explorer
In the open folder create a new file called “NoDriveTypeAutoRun”.
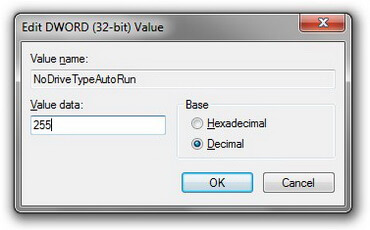
The changes will apply after you restart your computer.
Done. Now during AutoRun, you are protected from unauthorized installations of malware from any external media.
When, for example, you use a virus-infected USB flash drive, no malware will be installed in automatic mode.
Conclusion
CryptoTotem theme on Trezor Model T wallet
Get It >>>
After our detailed and comprehensive research, we are fully convinced that Trezor truly provides its clients with excellent service being safe and reliable.
Trezor is the first and the best hardware wallet to store your cryptocurrency. It helps you fully control the situation.
Trezor is your personal safe deposit, your pocket bank for storing money. Please carefully learn its capabilities and functions. The individual steps are well described in their blog and knowledge base, so it is unlikely that any questions will remain unanswered.
Twitter CEO Jack Dorsey chooses Trezor
Just bought a @Trezor hardware wallet with bitcoin through @CashApp pic.twitter.com/TBYn1q5XzI
— jack 🌍🌏🌎 (@jack) March 7, 2019

Enjoy your new security and HODL in peace!
We are pleased to recommend Trezor, especially if we are talking about safety of the coins and digital assets in large volumes.
No matter the model you choose: anyway it’s the safest option on the market today.
The safest way to get you Trezor hardware wallet is directly from the manufacturer
Thank you @CryptoTotem for the super-detailed review! 🤓👌✌️
— Trezor (@Trezor) 1 октября 2019 г.
Frequently Asked Questions
How does Trezor work?
Trezor is the world’s first hardware wallet that ensures safe cold storage of Bitcoins, altcoins, and tokens. The device is connected to your PC or smartphone over USB. It provides a user-friendly interface that furnishes all features of a hot wallet. Trezor will securely store your crypto and private keys in the autonomous mode, with no access to the external environment.
Is Trezor wallet safe?
Trezor hardware nature is by far more secure than software and particularly online wallets. As private keys are kept on a tangible device rather than on a PC or online service, the probability of stealing your funds and digital assets is reduced to zero.
Is Trezor wallet anonymous?
There is nothing that ties Trezor to your identity. For every transaction, Trezor generates a new wallet address that cannot be predicted. More importantly, any user can create a local copy of Trezor on their PC and remain fully unconnected from SatoshiLabs servers.
What do I do if I lose my Trezor?
To restore a Trezor wallet, you will need recovery seeds or Passphrase. Otherwise, you will not be able to do that if your device was lost, erased, or damaged.
Does Trezor work with Mac?
Trezor is compatible both with PCs and smartphones and supports the following operating systems: Linux, Android OS, macOS 10.11 and higher, Windows 7 and higher.
Can I connect Trezor to iPhone?
Unfortunately, Trezor has no iOS (Apple’s mobile operating systems) support so far.
How do I use Trezor on Android?
Download and install the app from Google Play. Open the app and connect Trezor with OTG (USB On-The-Go). The device will request access over USB. If you have already initialized your Trezor, enter your PIN and go to the main screen.
What do you think about this hardware wallet? Let us know your thoughts in the comments below.